Project configuration
Retype will read the retype.yml file for additional instructions on how to configure and build your project.
The retype.yml file is typically placed in the root of your project, although it can be placed elsewhere. Please ensure the inputoutput
When running retype start, any changes to your retype.yml file will automatically trigger Retype to regenerate the website and refresh your web browser.
If you started the local web server using retype serve, you will need to call retype build for a ✨ sparkly ✨ fresh new build of the project, then manually refresh your web browser to see the update. Using the command retype serve --live will automatically update all web browsers.
The retype.yml file is actually optional (not required), but is recommended as you will almost certainly want to customize some options, so adding a retype.yml is a good first step.
If you run the command retype start and do not have a retype.yml project configuration file within the root of your project, Retype will auto-generate a basic retype.yml file for your project. You can then edit the file to customize your project.
You can also explicitly have Retype generate a retype.yml file by running the command retype init.
The following sample demonstrates a common set of project configuration options and everything can be customized to your requirements.
input: .
output: .retype

url: docs.example.com # Use your website address here

start:
  # Try the Retype Pro features
  pro: true

branding:
  title: Project Name
  label: Docs

links:
  - text: Getting Started
    link: https://retype.com/guides/getting-started/

footer:
  copyright: "© Copyright {{ year }}. All rights reserved."
backlinks
This setting is Retype PRO only.
The backlinks configuration controls the automatic display of inbound links from other pages in your project. Backlinks help users discover related content by showing which pages reference the current page.
When enabled, backlinks are automatically included at the end of pages that have inbound links from other pages. The feature leverages Retype's dependency tracking system to build a web of interconnected content.
enabled
boolean
Enable or disable backlinks for the entire project. Default is true.
backlinks:
  enabled: true
When set to false, backlinks will not be displayed on any page unless explicitly enabled at the page level.
title
string
Customize the heading text displayed above the backlinks section. Default is "See also".
backlinks:
  title: "Referenced by"
The title appears as a heading above the list of pages that link to the current page.
maxResults
number
Set the maximum number of backlinks to display on each page. Default is 12.
backlinks:
  maxResults: 10
If a page has more inbound links than the maxResults value, only the first results will be shown. This helps keep the backlinks section manageable on highly referenced pages.
exclude
list
Exclude pages, folders, or path patterns from being added as backlinks in the See also section while still generating that content in the final website.
Use backlinks.exclude when you want content to remain accessible on the website, but not appear as a backlink on other pages.
Backlink filtering rules use the same path and pattern behavior as the project-level excludeinclude?, *, **, and ! are supported.
The following sample excludes all blog pages from being added to backlinks:
backlinks:
  exclude:
    - /blog
include
list
Explicitly include pages, folders, or path patterns as backlink sources that might otherwise be filtered out by backlinks.exclude
Backlink filtering rules use the same path and pattern behavior as the project-level excludeinclude?, *, **, and ! are supported.
Rules in backlinks.include override matching rules in backlinks.exclude
The following sample excludes everything from backlinks, then re-includes only /guides:
backlinks:
  exclude:
    - "*"
  include:
    - /guides
The backlinks configuration can be set at two levels with the following precedence:
branding
Branding configuration for your Retype generated website.
baseColor
This setting is Retype PRO only.
string
Set the base brand color for your project.
This is a convenient way to set the main theme color without using the full themebaseColor is #5495f1. To change the baseColor, use the following setting:
branding:
  baseColor: "#8839ef"
The baseColor setting is equivalent to setting base-color in the theme
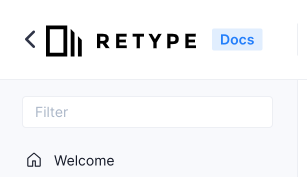
label
string
Optional logo label text. Default is Docs.
branding:
  label: Docs
The label is rendered as the following label in the upper-left corner of the generated website, to the right of the titlelogo

colors
object
Optional branding color overrides.
Use branding.colors when you want more control over the label styling than the default theme provides.
branding:
  colors:
    label:
      text: "#ffffff"
      background: "#ff0000"
label
object
Configure colors for the optional branding label shown beside the project title or logo.
branding:
  colors:
    label:
      text: "#ffffff"
      background: "#ff0000"
If either value is omitted, Retype uses the built-in theme styling for that part of the label.
logo
string
One of the following:
- The path to a logo file relative to the
input - An inline
<svg>logo
Default is null.
branding:
  logo: static/logo.png
logoDark
string
One of the following:
- The path to a logo file (dark mode) relative to the
input - An inline
<svg>logo
Default is null.
branding:
  logo: static/logo.png
  logoDark: static/logo-dark.png
logoWidth
number
Set a custom width for the branding logo image.
branding:
  logo: ./logo.svg
  logoWidth: 150
If logoWidth is not configured, Retype will automatically detect the intrinsic width of the configured logologoDark
logoHeight
number
Set a custom height for the branding logo image.
branding:
  logo: ./logo.svg
  logoHeight: 31
If logoHeight is not configured, Retype will automatically detect the intrinsic height of the configured logologoDark
logoAlign
string
Set a logo image alignment relative to the titleleft and right.
Default is left.
branding:
  logo: static/logo.png
  logoAlign: right
title
string
The main text title added to the upper-left corner of the generated website.
The title can be used in conjunction with logologoDarktitle and logo are configured, both will be added to the website. If only a title is configured, only the text title is used. If only a logo and/or logoDark are configured, only the logos are used.
branding:
  title: Example.com
The above title would create the following branding title in the upper-left corner of the generated website.
breadcrumb
This setting is Retype PRO only.
The breadcrumb navigation provides a hierarchical representation of the user's location within the website. The breadcrumb simplifies navigating website content structures, allowing for easier backtracking and understanding of the website layout.
enabled
boolean
To enable or disable the breadcrumb navigation within Retype Pro projects. Default is true.
For Retype Pro projects, breadcrumb navigation will be enabled by default.
For Retype projects (non-Pro), the breadcrumb navigation will not be added to any pages.
To disable the breadcrumb navigation across an entire project, set the enabled parameter to false as shown in the following sample:
breadcrumb:
  enabled: false # Disabled project wide
home
string or boolean
The home config allows customization of the initial node in the breadcrumb navigation. The parameter can accept either a string or a boolean value.
By default, the label used for the first item of the breadcrumb navigation will be the label of the project home page. This label can be customized or even removed.
Set with a custom label:
breadcrumb:
  home: Home # custom label
Use an Octicon icon instead of text for the Home node:
breadcrumb:
  home: ":icon-home:" # icon
Use an emoji:
breadcrumb:
  home: ":rocket:" # emoji
The entire first item of the breadcrumb navigation, the "Home" node, can be removed by setting home: false:
breadcrumb:
  home: false # Do not include the Home node
separator
string
The separator config allows for the customization of the node separator used between each page label in the breadcrumb navigation.
Using a pipe | character as the separator:
breadcrumb:
  separator: "|"
Using an icon as the separator:
breadcrumb:
  separator: ":icon-dot:"
blog
The blog configuration controls the behavior and appearance of the blog summary pages, including pagination and URL structure.
base
string
The URL base path segment used for the blog summary pages. Default is "blog".
blog:
  base: news
Setting base: news would generate the blog summary pages at /news/ instead of the default /blog/ path.
layout
string
Set the default layout for all blog posts. Default is blog.
blog:
  layout: page
Setting layout: page will render all blog posts using the page layout, which includes the left sidebar tree navigation and the right-side table of contents.
The layout can still be overridden on individual blog posts by setting the layout in the page frontmatter.
maxResults
number
The maximum total number of blog posts to include across all paginated summary pages. Default is unlimited.
blog:
  maxResults: 100
By default, all blog posts are included. Setting a maxResults value will cap the total number of posts that appear in the blog summary pages. Posts beyond the limit are excluded from the summary but remain accessible via direct URL.
pageSize
number
The number of blog post items to display per page. Default is 10.
blog:
  pageSize: 5
If the total number of blog posts exceeds the pageSize, Retype will automatically generate additional paginated summary pages.
title
string
A custom heading title for the blog summary page. Default is null.
blog:
  title: News
If no title is configured, Retype will use the default translated label for the current locale
rss
Custom configuration for the generated blog RSS feed.
maxResults
number
The maximum total number of blog posts to include in the generated RSS feed. Default is 20.
blog:
  rss:
    maxResults: 25
This setting applies only to the generated RSS feed and does not change the blog.maxResults limit used by the paginated blog summary pages.
title
string
A custom title for the generated RSS feed. Default is null.
blog:
  rss:
    title: Project Updates
If no title is configured, Retype will use the resolved blog title. The resolved blog title uses blog.title when configured, otherwise the generated blog summary heading. When available, meta.siteNamebranding.title
description
string
A custom description for the generated RSS feed. Default is null.
blog:
  rss:
    description: Latest project updates and release notes
If no description is configured, Retype will use the project meta.description value. If neither value is configured, the RSS description node is omitted.
copyright
string
A custom copyright value for the generated RSS feed. Default is null.
blog:
  rss:
    copyright: "© Copyright . Example, Inc. All rights reserved."
If no copyright is configured, Retype will use the resolved footer.copyright value. If neither value is configured, the RSS copyright node is omitted.
imageUrl
string
A custom image URL for the RSS <image> node. Default is null.
blog:
  rss:
    imageUrl: https://example.com/static/feed.png
If no imageUrl is configured, Retype will use the resolved site favicon URL when the favicon is a supported RSS image type (.gif, .jpeg, .jpg, .ico, or .png). If neither value resolves, the RSS <image> node is omitted.
cache
Cache configuration options.
strategy
string
Cache busting configuration for the website resources, such as the JavaScript (.js) and CSS (.css) files.
Helps to ensure a loaded page refers to the most recent JavaScript and CSS resources.
Specifies the approach Retype will use for cache invalidation.
Default is query.
cache:
  strategy: query
Below are demo URLs generated for corresponding cache.busting.strategy options:
strategy: none<script type="text/javascript" src="/resources/js/retype.js" />strategy: path<script type="text/javascript" src="/resources/js/retype.v1.10.js" />strategy: query<script type="text/javascript" src="/resources/js/retype.js?v=1.10" />token
string
An optional unique token used for website resource cache invalidation.
If specified, the provided value is used for all invalidatable resources as is.
If not specified, the default token having the following structure is used:
{Retype version}.{total milliseconds elapsed since 2000-01-01}
cache:
  token: v5
cname
boolean or string
In general, you should not require setting the cname. Please set the url
By default, if the urlcname: false.
cname: falseIf you do manually create a CNAME file, please ensure the value in the CNAME file matches the value set in the url
data
object
Custom data object for use in templates. Each key defined in data becomes a top-level variable available in all pages.
data:
  productName: Company X
  productVersion: v5.1
With the above configuration, `` outputs Retype in any page.
Data values can also be nested objects and arrays:
data:
  company:
    name: Company X
    foundedAt: 2020
  features:
    - Templating
    - Markdown
    - Search
Nested values are accessed using dot notation, such as {{ company.name }}. Arrays can be iterated with {{ for item in features }}.
Data is also accessible through the project.data variable, for example {{ project.data.productName }}.
Page-level data can also be set in the page frontmatter. Page-level data keys override project-level data keys of the same name.
edit
The edit config allows for enabling and customization of the Edit this page links on content pages.
Check out the bottom of this page for a working sample of Edit this page.
repo
string
The repository URL where the source files for this project are located.
Setting a repo value will enable the Edit this page links on all content pages.
edit:
  repo: "https://github.com/<your-organization>/<your-repo>/"
It is also possible to configure the links to point directly to the /edit/ view of the page:
edit:
  repo: "https://github.com/<your-organization>/<your-repo>/edit/"
base
string
An optional base path to a directory within the repository.
The base can be configured with an optional path to a directory within the repo
The following sample demonstrates how edit.base would be configured if the .md source files for this project are stored within the /src/docs sub-directory within the repo.
edit:
  repo: "https://github.com/your-organization/your-repo"
  base: /src/docs
The final Edit this page URL constructed by Retype for the sample above would be https://github.com/your-organization/your-repo/blob/main/src/docs/your-page.md.
branch
string
Point to a custom branch within the repo. Default is main.
edit:
  repo: "https://github.com/your-organization/your-repo"
  branch: master
label
string
A custom label for the link. Default is "Edit this page".
edit:
  repo: "https://github.com/your-organization/your-repo"
  label: Edit on GitHub
editor
Custom configuration to control the page live editor functionality that is only available when retype start is running.
enabled
boolean
To enable or disable the live editor. Default is true.
Set to false to disable and hide the live editor.
editor:
  enabled: false # Default is true
exclude
list
Retype can exclude files or folders from being built or copied to the outputexclude list within your projects retype.yml file.
Exclude patterns are similar to allowable patterns within a .gitignore file. The wildcards ?, *, **, and ! are supported.
The following sample demonstrates how to exclude an entire draft/ folder, any folder that ends with *_temp/, and one specific /src/temp.md file.
exclude:
  - "draft/"
  - "*_temp/"
  - "/src/temp.md"
You could exclude everything in your project with by adding exclude: [ * ].
By default, any file or folder name prefixed with a . or a _ will be excluded.
As well, any node_modules folder will be excluded.
To explicitly include any files or folders that might have been excluded, please see the include
favicon
string
A custom path to a .ico or .png file to be used as the favicon. Default is null.
The path is relative to the input
favicon: static/favicon.pngBy default, Retype will look for a favicon.ico or favicon.png within the root of the inputfavicon config would typically only be used if you want to store the favicon file in a subfolder of the output
footer
copyright
string
Site-wide copyright statement that will be added to the footer of each page. Supports Markdown syntax and {{ year }} variable.
footer:
  copyright: "© Copyright {{ year }}. [Example, Inc.](https://example.com/) All rights reserved."
links (footer)
object
The footer.links have the same configuration options as links
footer:
  links:
    - text: License
      link: license.md
      title: View the software license agreement
    - text: Support
      link: https://github.com/retypeapp/retype/discussions/
      title: Get help from the community
generator
directoryIndex
Configuration options to instruct Retype on how and when to deal with the default directory index files, such as index.html.
altNames
list
A list of file names to treat as default HTML files.
By default, Retype will treat all of the following files as default pages if they are within a folder.
generator:
  directoryIndex:
    altNames:
      - index.html
      - index.htm
      - default.html
      - default.htm
If you have a default.htm file within a folder and do not want it to be treated as a default page, then set altNames to the following:
generator:
  directoryIndex:
    altNames:
      - index.html
append
boolean
Specifies if the default document file name should be appended to resolved URLs. By default, Retype does not append the default file name.
If false, the generated link will be /guide/. If true, the generated link will be /guides/index.html.
generator:
  directoryIndex:
    append: true # default is false
Using append: true in combination with the search.preloadretype start. The following sample demonstrates how to configure:
search:
  preload: true

generator:
  directoryIndex:
    append: true
name
string
The default HTML document file name generated by Retype.
generator:
  directoryIndex:
    name: default.htm # Default is index.html
paths
string
Configures url kind preference for resolved urls. Supported values: source, relative, and root.
generator:
  paths: relative
recase
string
Instructs Retype on how to recase the project file and folder names created by the author. Default is all.
By default, Retype will recase all the generated file and folder names to all lowercase.
To have Retype NOT change the casing of any of your file or folder names, set recase to none.
generator:
  recase: none
trailingSlash
boolean
By setting trailingSlash: false in the project config, authors can instruct Retype to remove (or not add) the trailing / character when constructing links from paths to Markdown files.
For example, if you have a simple link in your project to [Example](/guide/example.md), Retype will create the link as /guide/example/. By setting trailingSlash: false in your project, Retype would then create the link as /guide/example.
It is best practice to include the trailing slash and by default, Retype will automatically add the trailing slash to links that are missing.
generator:
  trailingSlash: false # default is true
hub
This setting is Retype PRO only.
The Hub creates a handy shortcut link in the top-left of the page, just to the left of your project logo or title.
The hub link lets visitors easily jump back to your main site or central doc hub, such as linking from your documentation deployed at docs.example.com to example.com.
The hub link is useful when deploying multiple documentation projects and you would like a bridge to your primary documentation hub.
The hub is optional. If you would like a hub link, just set a URL in the link config.
link
string
Set to a local path or external URL. By setting the link value, the Hub will be enabled. To disable, remove the link config.
hub:
  link: https://example.com/ # default is empty
alt
string
Custom text value used to set the title attribute of the hub link.
hub:
  link: https://example.com/
  alt: Go to example.com
target
string
Sets the target attribute of the hub link and specifies which window or tab to open the link into.
hub:
  link: https://example.com/
  target: blank
If no target is configured, the link will open in the current tab.
The target can be set to any value, although blank is common and will open the link in a new tab. Retype will automatically transform the value blank into _blank which is the actual value required by the browser to indicate that a hyperlink should be opened in a new tab.
There are several other values that may be prefixed with an _ character, including self, parent, and top. The following table demonstrates some common scenarios and naming convention used by Retype to normalize the target values.
include
list
Retype can explicitly include files or folders that might have been excluded by default or excluded within the exclude
If you create a link to local static file, such as .zip file, Retype will automatically copy that file to the generated website.
That file or file type does not need to be explicitly configured to be included. Retype assumes that if you created a link to the file, you wanted that file published and it will be included in the output
Include patterns are similar to allowable patterns within a .gitignore file. The wildcards ?, *, **, and ! are supported.
The following sample demonstrates how to include all .py files, all .js files that start with the name demo, and the entire contents of any www folder within the project.
include:
  - "*.py"
  - "demo*.js"
  - "**/www/**"
You could explicitly include everything in your project with include: [ "*" ], but be careful as all files within your input
Retype treats all .md and .yml files as parsable content files that will be converted into .html files and are not copied over to the outputoutput unchanged and become static files that can be linked to.
By default, if Retype discovers any of the following file types, they will be automatically included and copied over to the output unchanged. If you require any other file types, they would need to be explicitly added to the include config.
File types that are automatically included:
*.ai*.bmp*.eps*.gif*.heif*.htm*.html*.jpeg*.jpg*.pdf*.png*.svg*.tiff*.txt*.webp*.zip
By default, if Retype discovers any of the following folders anywhere within the project, the folder and its entire contents will be copied over to the output unchanged. If you require any other folders, please add to the include config.
Included folders:
**/static/****/public/****/assets/****/resources/**
If you would rather not include certain folders, files, or file types, please add the pattern to the exclude
input
string
Custom path to the input directory. Default is ..
The path is relative to the retype.yml location.
input: ./srcintegrations
More integrations will be added over time. Do you have an integration suggestion? let us know.
googleAnalytics
Add Google Analytics to your website.
string
Google Analytics ID value.
integrations:
  googleAnalytics:
    id: <id>
Replace the <id> with your Google Analytics measurement id. For example:
integrations:
  googleAnalytics:
    id: A-BCDEFGHIJ1
googleTagManager
Add the Google Tag Manager to your website.
string
Google Tag manager ID value.
integrations:
  googleTagManager:
    id: <id>
Replace the <id> with your Google Tag Manager measurement id.
gravatar
Specific setting to control Retype integration with the Gravatar profile picture service and used by the page.authors configuration.
default
string
The default profile image to return from Gravatar queries whenever no image is assigned to the queried email address. Default value is mp.
Either a full URL to the image can be configured or one of the options listed below:
| Value | Sample |
|---|---|
404 |
Broken image |
mp (default) |
|
identicon |
|
monsterid |
|
wavatar |
|
retro |
|
robohash |
|
blank |
Blank image |
Please see the Default Image documentation on the Gravatar website.
enabled
boolean
Whether Retype should use Gravatar to pull profile images. Default is true.
Setting to false will show the default image or specified resource.
Disabling Gravatar will also reset the default avatar to the Retype default.
plausible
Plausible.io is a simple and privacy-friendly Google Analytics alternative which can be integrated easily into Retype generated websites.
domain
string
When you setup your project within Plausible, you enter a Domain value which is then used to set the integrations.plausible.domain config within your retype.yml project configuration file.
integrations:
  plausible:
    domain: <string>
Plausible can also send statistics to multiple dashboards by configuring a comma-separated list of domains. For example:
integrations:
  plausible:
    domain: domain1.com,domain2.com,subdomain.yourdomain.com
Check out the Plausible documentation for more details.
host
string
The Plausible service can be self-hosted and your Retype project can be configured to use your custom host.
integrations:
  plausible:
    host: <string>
A typical host project configuration would look like the following sample:
integrations:
  plausible:
    host: plausible.example.com
If no transfer protocol is supplied, Retype will default the host value to use https.
All of the following sample host values are supported:
host: example.com
host: docs.example.com
host: https://example.com
host: http://example.com
host: example.com/js/plausible.js
host: docs.example.com/js/plausible.js
labels
object
Customize built-in UI labels and messages for your project.
The labels config is organized into named collections. Each collection contains one or more label keys, such as search_input_placeholder or toc_contents_label.
labels:
  default:
    search_input_placeholder: Search the docs
    toc_contents_label: On this page

  fr:
    search_input_placeholder: Rechercher dans la documentation
Use the default collection to override the built-in English defaults and to provide fallback values. Add a collection matching the active localefr, when you want to override the built-in wording for that language.
For supported locales, Retype uses the built-in translation for the active locale and then applies any matching labels.<locale> overrides. If no locale-specific override is configured, Retype continues using the built-in translation. For custom locale values, Retype uses your configured label collections.
locale: partner

labels:
  default:
    search_input_placeholder: Search docs

  partner:
    search_input_placeholder: Search partner docs
This is useful when you want different wording for a partner portal, support site, or internal handbook without maintaining theme overrides.
Using the template syntax, the labels are also available through project.labels, such as {{ project.labels["search_input_placeholder"] }}.
lastUpdated
The lastUpdated project configuration controls the automatic last updated footer metadata for pages across the entire project.
Retype reads Git commit metadata for each page and can render the last updated date and, optionally, who made the change. If the build does not have full Git history, the generated values are skipped.
The default project behavior is equivalent to:
lastUpdated:
  date:
    enabled: true
    source: committer
  by:
    enabled: false
    source: committer
If you want to set fixed values for one page, use the page lastUpdated configuration instead. Manual page values override the project-level generated values for that page.
date
Controls the automatic last updated date in the page footer.
enabled
boolean
Enable or disable automatic last updated date generation. Default is true.
lastUpdated:
  date:
    enabled: false
Set date.enabled: false when you do not want Retype to show a generated last updated date in the footer.
source
string
Choose which Git revision timestamp is used for the last updated date. Supported values are author and committer. Default is committer.
lastUpdated:
  date:
    source: author
Use author when the footer should reflect the original author timestamp. Use committer when it should reflect the most recent committed change.
by
Controls the automatic last updated by value in the page footer.
enabled
boolean
Enable or disable automatic last updated by generation. Default is false.
lastUpdated:
  by:
    enabled: true
This is off by default, so turn it on only when you want the footer to show who made the change.
source
string
Choose which Git revision identity is used for the by value. Supported values are author and committer. Default is committer.
lastUpdated:
  by:
    enabled: true
    source: author
Use author when the footer should show the original author name. Use committer when it should show the person who actually committed the change.
GitHub Actions
If you build in GitHub Actions, fetch the full history so Git-backed lastUpdated values are available:
- uses: actions/checkout@v6
  with:
    fetch-depth: 0
fetch-depth: 0 tells GitHub Actions to download the full commit history instead of only the most recent commits.
See also the Last Updated component, page configuration, and the GitHub Actions guide.
links
Custom links added to the top-bar navigation of all pages.
The following sample demonstrates a basic links scenario which would add one link to the top bar of all pages.
links:
  - text: Getting Started
    link: https://retype.com/getting_started/
text
string
The link text label.
links:
  - text: Demos
    link: https://demo.example.com/
link
string
The URL to use for the link. The link can be a .md file name, or to any internal path, or to any external URL.
If a .md file set, such as sample.md, Retype will automatically resolve the path and in the generated website, the sample.md value will be replaced with the path to the actual generated HTML file.
links:
  - text: About us
    link: /about/
icon
string
An icon to use with the link. Default is null.
links:
  - text: Issues
    link: https://github.com/retypeapp/retype/issues/
    icon: bug
Options include using an Octicon name, Emoji shortcode, <svg> element, or a path to an image file.
icon: rocketicon: ":rocket:"icon: <svg>...</svg>icon: ../static/rocket.pngiconAlign
string
The position for the icon relative to the link text. Either left or right. Default is left.
links:
  - text: Demos
    link: https://demo.example.com/
    icon: link-external
    iconAlign: right
target
string
Sets the target attribute of the hyperlink and specifies which window or tab to open the link into.
links:
  - text: Demos
    link: https://demo.example.com/
    target: blank
If no target is configured, the link will open in the current tab.
The target can be set to any value, although blank is common and will open the link in a new tab. Retype will automatically transform the value blank into _blank which is the actual value required by the browser to indicate that a hyperlink should be opened in a new tab.
There are several other values that may be prefixed with an _ character, including self, parent, and top. The following table demonstrates some common scenarios and naming convention used by Retype to normalize the target values.
items
list
Add nested menu items to a top-level links
links:
  - text: Guides
    items:
      - text: Installation
        link: /guides/installation.md
        icon: download
      - text: Configuration
        link: /configuration/project.md
        title: Project configuration options
When items are configured, Retype renders the parent link as a dropdown trigger in the header navigation. Dropdown menus are supported one level deep.
Each nested item supports the same link properties as a top-level link, including textlinkiconiconAligntargettitle
title
string
Sets the title attribute of the generated HTML hyperlink. This creates a browser tooltip that appears when users hover over the link.
The title property applies to both linksfooter.linksretype.yml file.
links:
  - text: Getting Started
    link: https://retype.com/getting_started/
    title: Learn how to install and configure Retype
The configuration above generates the following HTML:
<a href="https://retype.com/getting_started/" title="Learn how to install and configure Retype">Getting Started</a>When a user hovers over the "Getting Started" link, the browser displays "Learn how to install and configure Retype" as a tooltip.
The text property sets the visible link text, while title sets the hover tooltip. The title is optional and useful for providing additional context or description without cluttering the visible interface.
locale
The value of the locale config defines the primary language that will be used on the generated website. For supported locales, Retype will generate the website using system messages and labels in that language. The same setting can also point to a custom labels
This flexibility makes your application more versatile and accessible to users from different languages. Currently, 24 languages are supported by Retype.
Please visit the Retype Translation project for more details on adding new languages and making changes to existing languages.
string
You can switch the locale to any other supported language by providing the corresponding ISO language code as listed below. You can also set locale to a custom value that matches a collection in labels
Default is en.
The following sample demonstrates switching the project to use French.
locale: frdateFormat
string
Configure how dates are rendered across the website, including blog publish dates and the Last Updated component.
locale:
  dateFormat: MM-dd-yyyy
If dateFormat is not configured, Retype uses the resolved default date format for the active locale. A custom default can also be configured using the Default_DateFormat label key in labels
If both locale.dateFormat and labels.default.Default_DateFormat are configured, locale.dateFormat takes precedence.
The following format specifiers are supported:
Common full date strings can be composed by combining the supported specifiers:
Month and day names generated by dateFormat respect the active locale. For example, locale: fr outputs French month and day names.
Supported Languages
markdown
Markdown configuration options.
lineBreaks
string
Switches between soft and hard line break modes. The option instructs Retype in what way a regular line ending should be handled.
- in
softmode, regular line breaks are processed as soft breaks (no<br />is emitted to HTML markup), unless a line contains 2+ spaces before a line break. - in
hardmode, regular line breaks are always emitted as<br />HTML elements.
Default is soft.
markdown:
  lineBreaks: soft # or, hard
meta
Project wide meta tag configuration options.
title
string
Common site-wide suffix appended to the html <title> element of all pages. Default is null.
meta:
  title: " | Example.com - Widgets for the internet"
Using the sample above, if we had an About us page, the final <title> would be:
<title>About us | Example.com - Widgets for the internet</title>See also, the Page level meta.title configuration.
siteName
string
Sets the value for the <meta property="og:site_name"> meta tag.
meta:
  siteName: Retype
The above configuration generates:
<meta property="og:site_name" content="Retype">nav
Navigation configuration options to control the behavior of the left sidebar navigation.
mode
This setting is Retype PRO only.
string
Controls how the sidebar navigation is created and functions. The default functionality is to create the navigation as an expandable Tree structure. The default value for mode is default.
The following sample demonstrates how to configure the "stacked" navigation structure:
nav:
  mode: stack # Pro key required
To convert only one top-level directory to a stack type layout, please see the Page nav setting.
icons
mode
This setting is Retype PRO only.
The mode configuration enables customization for how the icons are displayed in the main navigation. The mode allows you to hide all icons (and their reserved space) in the navigation, as well as other icon show/hide scenarios.
string
Controls how icons are displayed in the left sidebar navigation. The default value is all, which shows all icons or reserves space for all icons within the navigation.
The following sample demonstrates how the icon mode can be configured in your retype.yml file:
nav:
  icons:
mode: all|none|folders|pages|top # Default is allTo hide icons for all pages and folders, add the following setting to your project retype.yml configuration file:
nav:
  icons:
    mode: none
The nav.icons.mode setting can be used in conjunction with nav.mode: stack
nextprev
This setting is Retype PRO only.
The nextprev configuration controls the display of "Next" and "Previous" navigation buttons at the bottom of each page and whether a page is included in the navigation sequence.
mode
string
Controls how the Next/Previous navigation buttons are displayed and whether the page is included in the navigation sequence.
The default value is show.
nextprev:
  mode: hide
The nextprev.mode setting can be configured at three levels with the following precedence:
outbound
This setting is Retype PRO only.
The outbound configuration gives you the flexibility to customize the behavior of outbound links in your Retype project. It allows you to control which links are treated as outbound, where they open, what icon is used, and even exclude or include specific domains. For instance, example.com.
The outbound functionality will be automatically enabled for Retype Pro project. For projects that do not have a Retype Pro license, the outbound configuration and functionality is ignored.
If outbound is enabled, Retype will find all external (outbound) links within the project, add a trailing icon, and set the link to open in a new tab when clicked.
enabled
boolean
Controls whether the outbound links feature is enabled.
The default is true for Retype Pro projects.
The following sample demonstrates disabling the outbound functionality:
outbound:
  enabled: false
custom
string
Provides a way to specify custom attributes to be added to the outbound links. The default value is empty/null.
The following sample demonstrates how to add the attribute rel="noopener noreferrer" to all outbound links:
outbound:
  custom: 'rel="noopener noreferrer"'
icon
string
Defines the icon to be used for outbound links and accepts all the same options as the links.iconlink-external .
outbound:
  icon: link-external
If you would prefer to keep the outbound functionality enabled, but not include the icon, please set icon: "". The following sample demonstrates:
outbound:
  icon: ""
iconAlign
string
Determines the alignment of the icon for outbound links and accepts the same options as the links.iconAlignright or left. The default value is right.
outbound:
  iconAlign: right
target
string
Specifies the target attribute for the outbound links. The default value of "blank" opens the link in a new window or tab.
outbound:
  target: blank
exclude
list
A list of outbound link patterns to be excluded from being captured by the Retype outbound functionality. This is useful if you do not want certain links to open in new tabs.
This configuration accepts similar path patterns as the exclude
The following sample demonstrates excluding all links pointing to example.com.
outbound:
  exclude:
    - example.com
Please also see outbound.include
include
list
A list of outbound link patterns to be included for the Retype outbound functionality. This is useful if you only want certain links to open in new tabs. The default value of * includes all links.
This configuration accepts similar path patterns as the include
The following sample demonstrates including only links that point to example.com.
outbound:
  include:
    - example.com
If any item is added to the include list, by default, all other paths will be excluded. Please also see outbound.exclude
output
string
Custom path to the output directory. Default is .retype.
The path is relative to the retype.yml location.
output: ./docsThe output directory is only used when using the retype build command.
If using retype start, files are stored in memory and not written to disk.
poweredByRetype
This setting is Retype PRO only.
Controls whether to include or exclude the Powered by Retype branding.

boolean
With a Retype Pro license, the Powered by Retype branding can be removed by setting to false.
poweredByRetype: true # Set to `false` to remove.scheme
This setting is Retype PRO only.
The scheme configuration allows you to control the default color mode (light or dark) for your Retype generated website. By default, Retype will automatically match the visitor's system preference, but you can explicitly set the site to always render in either dark or light mode.
mode
This setting is Retype PRO only.
string
Controls the default color scheme for the website. The default value is system, which will automatically switch between dark and light modes based on the visitor's system preference.
To configure Retype to always render in dark mode, add the following to your retype.yml:
scheme:
  mode: dark
To always render in light mode:
scheme:
  mode: light
To use the system preference (default):
scheme:
  mode: system
If a visitor has explicitly selected dark or light mode using the color scheme toggle in the upper-right menu, their choice will take precedence over the scheme.mode project setting.
You can test the scheme.mode feature locally without a Retype Pro key by adding the following to your retype.yml to your project configuration file:
start:
  pro: true
search
Customization of the website search component.
exclude
This setting is Retype PRO only.
list
Exclude pages, folders, or patterns from the search index while still generating that content in the final website.
Use search.exclude when you want content to remain accessible on the website, but not appear in search results. If you want to exclude content from the generated website entirely, use the project exclude
Search filtering rules use the same path and pattern behavior as the project-level excludeinclude?, *, **, and ! are supported.
The following sample excludes all content under /blog and /draft from search results:
search:
  exclude:
    - /blog
    - /draft
include
This setting is Retype PRO only.
list
Explicitly include pages, folders, or patterns in the search index that might otherwise be filtered out by search.exclude
Search filtering rules use the same path and pattern behavior as the project-level excludeinclude?, *, **, and ! are supported.
Rules in search.include override matching rules in search.exclude
The following sample excludes everything from search, then re-includes only /blog:
search:
  exclude:
    - "*"
  include:
    - /blog
excludeCode
boolean
Exclude code blocks from the search index. Default is false.
When set to true, code blocks will not be included in the search index and will not appear in search results.
search:
  excludeCode: true # Default is false
hotkeys
list
Keyboard key to set the cursor focus into the search field. Default is k.
The following sample demonstrates how to change the search hotkey to use / instead of the default k:
search:
  hotkeys:
    - "/"
maxResults
number
Max number of search results to render. Default is 20.
search:
  maxResults: 20
minChars
number
Min number of characters required in a search query. Default is 2.
The following sample demonstrates how to configure search.minChars with a new value:
search:
  minChars: 3
mode
string
The search index creation mode. Default is full.
The following sample demonstrates how to configure search.mode with a new value:
search:
  mode: partial
If your project includes a lot of content and your users find the search is running too slow, try changing to mode: partial or even a mode: basic if the website is really huge.
noResultsFoundMsg
string
Message rendered when no results were found. Default is "Sorry, no results found.".
search:
  noResultsFoundMsg: Sorry, no results found.
placeholder
string
Placeholder text rendered on the search component. Default is "Search".
search:
  placeholder: Search
preload
boolean
Specifies if the search index should be preloaded. Default is false.
search:
  preload: true # Default is false
Using preload: true in combination with the generator.directoryIndex.appendretype start. The following sample demonstrates how to configure:
search:
  preload: true

generator:
  directoryIndex:
    append: true
serve
Custom configuration for the built in Retype development web server.
host
string
Serve the website from this host location. Default is localhost.
serve:
  host: 127.0.0.1
By default, the Retype development web server will serve from http://localhost:5001, although the port could be dynamically assigned if port 5001 is already in use.
A custom port value can also be assigned.
serve:
  host: 127.0.0.1:5005
A custom --host value can also be passed as an argument to the retype start and retype serve commands. If included, the --host value will override the host set within your retype.yml project configuration file.
retype start --host 127.0.0.1              # serve from a custom host
retype start --host 127.0.0.1 --port 5005  # serve from a custom host and port
port
number
A custom port for the internal Retype development web server to use when hosting locally. Default is 5001.
serve:
  port: 5005
If the default port is already being used by another service, Retype will auto-increment the port number until it finds an open port to host from.
If a custom port is explicitly configured in the retype.yml and if that port is already being used by another service, Retype will write a message to the console and exit. In that scenario, because the port was explicitly configured, Retype will not attempt to auto-increment.
The port number can also be included in the host
A custom --port value can also be passed as an argument to the retype start and retype serve commands. If included, the --port value will override the port set within your retype.yml project configuration file.
retype start --port 5005 # serve from a custom portwatch
Custom configuration for the retype serve and retype start commands.
mode
string
During retype start and retype serve, the mode configuration instructs the web server on where to host files from.
If memory, the entire website is built and then stored in memory during development with no files being written to disk.
If disk, the entire website is built and written to disk, then the web server will host those files from their disk location.
Default is memory.
serve:
  watch:
    mode: disk
The command retype build will always build and write all files to disk. The memory configuration is not an option with retype build. The Retype GitHub Action uses retype build. The command retype start is only to be used during local development and not on a live production web server.
polling
boolean or number
Instructs the local web server on how it should listen for file changes.
If false, the native filesystem event listeners are used to monitor for file changes.
If true, Retype will poll for file changes within your projects
The poll interval is configurable by setting a number value. For instance, setting polling: 500 would configure a 500ms interval.
Default is false.
serve:
  watch:
    polling: true
Performance Warning
Disk polling may be a costly operation, especially in projects with a large quantity of files, and/or running over remote mounted directories (ftp mapping, NFS, SMB...). If configuring the poll interval, please adjust the value down in steps, monitoring performance as the poll interval decreases.
On the flip side, increasing the polling interval may cause an annoying experience during retype start as file changes will require a longer time before reflected in the browser.
validation
string
Configure how thorough Retype is while looking for changed files.
Default value is optimal.
showSidebarFilter
boolean
The showSidebarFilter project setting controls the visibility of the filter component in the left sidebar above the navigation tree. Default is true.
By default, this setting is true, meaning the filter component is displayed. If set to false, the filter component will be hidden, allowing for a more streamlined sidebar layout. This option can be useful for simplifying the user interface in projects where filtering topics is not necessary.
showSidebarFilter: falsesnippets
The snippets configuration allows for the project with custom configuration of code block formatting, including the project wide enabling of line numbering.
lineNumbers
list
A list of code block reference language strings to enable line numbering on. Default is null.
js and json code blocks site widesnippets:
lineNumbers:
- js
- jsonConfiguring the "*" wildcard will enable line numbering for all code block types, including code blocks with no explicit reference language.
snippets:
  lineNumbers:
    - *
Enabling line numbering site wide on code blocks with no explicit reference language is configured with the none "none" specifier.
snippets:
  lineNumbers:
    - none
start
The start config contains project options that apply during the retype start CLI command.
open
boolean
Set to false to instruct Retype to not open the default web browser when the command retype start is run. By default, Retype will open a web browser when retype start is run.
The default is true.
The following sample demonstrates how to prevent the default web browser from opening during retype start:
start:
  open: false
Using the CLI command retype start -n or retype start --no-open will also prevent the default web browser from being opened.
pro
boolean
The default is false.
The following sample demonstrates how to start your project in Pro mode and trial the Retype Pro features:
start:
  pro: true
Using the CLI command retype start --pro will also start the project in Pro mode.
debounce
number
Delay how quickly retype start reacts to file changes, in milliseconds. The default is 100.
The following sample demonstrates adding a 500 ms debounce during retype start:
start:
  debounce: 500
Using the CLI command retype start --debounce 500 will override this project setting for the current run.
templating
Configurations to control the Retype content templating engine for this project.
enabled
boolean
A project-wide option to enable or disable the Retype content templating engine. Default is true.
templating:
  enabled: true # Set to false to disable
The templating engine can also be disabled on a per-page basis by setting templating: false in the page metadata.
liquid
boolean
Specifies if Liquid syntax {% ... %} is enabled. If liquid: true is set, Retype is incompatible with GitBook style of component configuration.
Default is false.
templating:
  liquid: false # Set to true to enable
loopLimit
number
Sets the maximum number of iterations allowed for loop statements in templates. This is a safety mechanism to prevent infinite loops and excessive resource consumption during template rendering.
Default is 1000.
templating:
  loopLimit: 1000 # Maximum loop iterations allowed
When a template contains loops that exceed the configured loopLimit, Retype will throw a build error and halt the build process.
templating:
  loopLimit: 500 # Reduce limit for stricter control
Setting loopLimit: 0 disables loop limit enforcement entirely, allowing unlimited loop iterations. Use with caution as this can lead to performance issues or build timeouts with poorly designed templates.
templating:
  loopLimit: 0 # Disable loop limit (not recommended)
Common use cases
Large datasets: If your templates process large collections of data (such as comprehensive lists, extensive navigation menus, or bulk content generation), you may need to increase the loop limit:
templating:
  loopLimit: 5000 # For processing large datasets
Strict resource control: For projects where template performance is critical, you can reduce the limit to catch potentially problematic templates early:
templating:
  loopLimit: 100 # Strict limit for performance-critical projects
Error handling
When the loop limit is exceeded, Retype will display an error message similar to:
ERROR: [template.md:1] Evaluation error. Exceeding number of iteration limit `1000` for loop statement.This error indicates that a template contains loops that process more items than the configured limit allows. To resolve this, either:
- Increase the
loopLimitvalue if the large loop is intentional - Optimize the template to reduce the number of loop iterations
- Split large datasets into smaller, more manageable chunks
Performance
Loop limits help maintain build performance by preventing runaway templates. Consider the following when setting loop limits:
- Build time: Higher limits allow more complex templates but may increase build times
- Memory usage: Large loops can consume significant memory during template processing
- Template complexity: Nested loops count towards the total iteration limit
For most projects, the default limit of 1000 iterations provides a good balance between flexibility and performance protection.
namespace
string
An optional namespace prefix for template variables. When set, project, page, and content variables are nested under the specified namespace.
Default is null (no namespace prefix).
templating:
  namespace: retype
With the above configuration, template variables are accessed as {{ retype.project.branding.title }} instead of {{ project.branding.title }}.
Nested namespaces are also supported:
templating:
  namespace: my.docs
This would make variables accessible as {{ my.docs.project.branding.title }}.
theme
This setting is Retype PRO only.
The theme configuration allows you to customize the visual appearance of your Retype website by overriding colors and other design elements to match your brand or project preferences.
base
object
The base theme configures the light mode appearance and serves as the foundation for your site's design. All theme variables can be customized within this section.
theme:
  base:
    base-color: "#8839ef"
    base-link-weight: 500
nav-item-text-active-weight: 700theme:
base:
# Primary brand color
base-color: "#8839ef"
base-bg: "#eff1f5" # Base background color
# Variants
primary: "#1e66f5" # Blue
success: "#40a02b" # Green
danger: "#d20f39" # Red
warning: "#df8e1d" # Yellow
# Typography
base-link-weight: 500
# Navigation
nav-item-text-active-weight: 700dark
object
The dark theme specifically targets dark mode appearance. When the website is switched to dark mode, the dark theme variables override the dark theme variables:
theme:
  dark:
    base-color: "#ca9ee6"
    base-bg: "#303446"
toc
This setting is Retype PRO only.
The toc config contains project options that apply to the right sidebar Table of Contents.
depth
string, number
The heading depth to include in the right Table of Contents.
The default is 2-3.
toc:
  depth: 2-3
The toc can be configured at the Project or Page levels.
Configuring the toc at the Page level overrides the Project level settings.
Acceptable values for depth include:
label
string
A custom label for the top of the Table of Contents column.
toc:
  label: On this page
url
string
The base URL of your website.
url: example.comThe url can also be a subdomain.
url: docs.example.comIf you deploy your Retype generated website into the subfolder of another website, add the subfolder in the url. For example, if the website will be available at https://example.com/docs, add that docs folder name to the url.
url: example.com/docsIf no protocol is supplied, such as https or http, Retype will assume https. A protocol can be explicitly defined by passing in the url.
url: http://example.com/docs/Another common scenario for setting a url is when using GitHub Pages without a custom CNAME.
For instance, if your GitHub organization was CompanyX and your repo was named docs, the URL to your GitHub Pages hosted website would be https://companyx.github.io/docs/.
Retype needs to know where your website will be hosted, so the url configuration for the above scenario would be:
url: companyx.github.io/docs